

Sunday, December 30, 2012
Big And Easy Nail Art Tutorial
Just a little thing I found that I thought you might like :) xx
Just a little thing I found that I thought you might like :)
How Ta Make Matte Nail Polish :)
Hello :)
Welcome to my ''How To Make Matte Nail Polish'' tutorial.
Tutorial number 1.
What you need:
 -Some eyeshadow (shiny or not, doesn't matter).
-Nail polish the same color as the the eyeshadow (With about a third of the pot empty, so you have some space to put in the eyeshadow).
-A little plate or bowl.
-A toothpick.
Step 1: Take the eyeshadow and with your fingers or a spoon, grind it down and make it as small as possible, make sure not to leave any lumps.
Step 2: Open your nail polish pot (make sure it isn't dried out, and pretty fluid, otherwise the eyeshadow won't mix), and bit by bit, pour the eyeshadow mix in while stirring with the toothpick. Be sure to not leave any bit of it unmixed, otherwise when you put it on, it won't be even.
Enjoy :)
Tutorial number 2:
This is if you don't want to use a whole pot of nail polish :)
What you need:
-Some eyeshadow.
-Nail polish the same color as your eyeshadow.
-A little plate or container.
-A toothpick.
-A nail polish brush.
Step 1: Grind the eyeshadow, like in the first tutorial.
 Step 2: Pour as much nail polish as you need on to the plate or container.
Step 3: Add the eyeshadow and stir with the toothpick.
Step 4: Apply on to your nails with the nail polish brush.
These were my little ''How To Make Matte Nail Polish'' tutorial, hope this helps :)
Feel free to contact me or comment if you have suggestions or anything to say. :)
Byebye ;)xxx
Welcome to my ''How To Make Matte Nail Polish'' tutorial.
Tutorial number 1.
What you need:
-Some eyeshadow (shiny or not, doesn't matter).-Nail polish the same color as the the eyeshadow (With about a third of the pot empty, so you have some space to put in the eyeshadow).
-A little plate or bowl.
-A toothpick.
Step 1: Take the eyeshadow and with your fingers or a spoon, grind it down and make it as small as possible, make sure not to leave any lumps.
Step 2: Open your nail polish pot (make sure it isn't dried out, and pretty fluid, otherwise the eyeshadow won't mix), and bit by bit, pour the eyeshadow mix in while stirring with the toothpick. Be sure to not leave any bit of it unmixed, otherwise when you put it on, it won't be even.
Enjoy :)
Tutorial number 2:
This is if you don't want to use a whole pot of nail polish :)
What you need:
-Some eyeshadow.
-Nail polish the same color as your eyeshadow.
-A little plate or container.
-A toothpick.
-A nail polish brush.
Step 1: Grind the eyeshadow, like in the first tutorial.
Step 2: Pour as much nail polish as you need on to the plate or container.Step 3: Add the eyeshadow and stir with the toothpick.
Step 4: Apply on to your nails with the nail polish brush.
These were my little ''How To Make Matte Nail Polish'' tutorial, hope this helps :)
Feel free to contact me or comment if you have suggestions or anything to say. :)
Byebye ;)xxx
Sunday, June 10, 2012
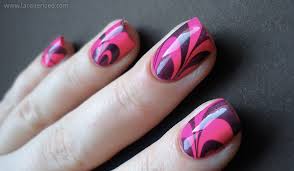
How To Create Nail Marbling Effects
Welcome to the "How To Create Nail Marbling Effects"tutorial.
 What you need:
-A glass
-Water
-2 or more nail varnishes
-A toothpick
-Clear base and top coat
- Cotton bud
Step 1: Apply base coat
Step 2: Apply one or two coats of your desired nail varnish

Step 3: Fill the glass with water.
Step 4: Put a few drops of nail varnish in the water, the better the quality the better the effect! :)
You can use different colors to do this.
Step 5: With the toothpick make the design you want in the water.
Step 6: Take the cotton bud and remove unwanted nail varnish from the design.
 Step 7: Place your nail on top on the water for about 5-10 seconds without moving it.
Step 8: Remove nail from water.
Step 9: When dry apply top coat.
That was my little "How To Create Nail Marbling Effects" tutorial. :)
Feel free to leave comments or to contact me if you want me to do any more tutorials. xx :)
-A glass
-Water
-2 or more nail varnishes
-A toothpick
-Clear base and top coat
- Cotton bud
Step 1: Apply base coat
Step 2: Apply one or two coats of your desired nail varnish
Step 3: Fill the glass with water.
Step 4: Put a few drops of nail varnish in the water, the better the quality the better the effect! :)
You can use different colors to do this.
Step 5: With the toothpick make the design you want in the water.
Step 6: Take the cotton bud and remove unwanted nail varnish from the design.
 Step 7: Place your nail on top on the water for about 5-10 seconds without moving it.
Step 8: Remove nail from water.
Step 9: When dry apply top coat.
That was my little "How To Create Nail Marbling Effects" tutorial. :)
Feel free to leave comments or to contact me if you want me to do any more tutorials. xx :)
Saturday, April 28, 2012
How To Do Ooglie Monster Nail Art
 How to do ooglie monster nail art! :)
What you need
-Brightly colored nail varnish.
-Ooglie eyes. :)
-Black nail varnish (preferably a nail art pen, or you can use a toothpick).
-Clear base and top coat.
Step 1: Apply base coat.
Step 2: Apply 2 coats of brightly colored nail varnish.
Step 3: Stick the ooglie eye in the middle of the nail on the still wet nail varnish.
Step 4: With the black nail varnish draw a little mouth under the eye, you can even draw little eyelashes! :)
Step 5: Apply top coat.
There you go! Ooglie eyed monster nails! :D
Feel free to leave comments. :) xx
How To Make Scrabble Nail Art

What you need:
-Cream colored nail varnish ( it works with any other colour but looks better in cream).
-Black nail varnish (preferably nail art pens, but if not you can use a toothpick).
-Clear base and top coats.
Step 1: Apply base coat.
Step 2: Apply 2 coats of cream nail varnish.
Step 3: Draw a letter in the middle of your nail, it can be any letter, but if you want to make a word, make sure it's 5 letters long, if there is less, for example 4 letters, you can fill in the thumb with a little picture :)
Step 4: Draw a little number in the right corner of your nail, it always looks better if you get the numbers right.
Step 5: Apply top coat.
All done!
Feel free to leave comment! :) xx
Friday, April 27, 2012
How To Do Converse Nail Art


Here is my little "How To Do Converse Nail Art Tutorial", good luck!
What you need:Different colored nail varnishes (preferably bright colours). Black and white nail art pens ( if you don't have any, a toothpick dipped in the stuff is just as good). Clear top and base coat.
Step 1: Apply clear base coat.
Step 2: Apply the white nail varnish on the whole tip of your nail, if it is too short don't hesitate to overlap a bit.
Step 3: Apply your colored nail varnish from the bottom of the nail, up to the white, overlapping a bit and making a slightly curved line.
Step 4: Use the black nail art pen or the toothpick dipped in black nail varnish to make three little dots on either side of the nail to make the lace holes.
Step 5: Use the white nail pen or the toothpick dipped in white to draw zig-zaggy lines between the lace holes to make laces.
Step 6: Take the black pen again to make a curved line on the white tip.
Step 7: Apply base coat.
There we go! Perfect converse nails! Thanks for reading. Bye bye :) xx
Feel free to comment!
How To Make Cow Nails

Welcolme to my little "How To Make Cow Print Nails" tutorial. :)
What you need:
-White nail varnish
-Black nail varnish
-Light pink nail varnish
(Preferably nail art varnishes but if not you can always use a toothpick.)
-Base and top coats
Step 1: Apply clear base coat.
Step 2: Apply one or two layers of white nail varnish, depending on the type.
 Step 3: When the white has completely dried, gently tap the black nail varnish ( on the tooth pick on on your nail art pen.) onto your nail in one place at a time to make a cow print effect. ( If you want to make cow faces, leave the to of your nail white and do the cow print around the bottom of your nail leaving the middle bit free. If you don't then skip to Step 6.)
Step 4: If you wanted to do the cow faces, apply a coat of light pink nail varnish on the top on your of your nail.
Step 5: Add little dots to make the eyes and nostrils.
Step 6: When everything is dry, apply clear top coat.

Bye bye ;) xx
P.S: Feel free to leave comments. :)
Subscribe to:
Posts (Atom)